
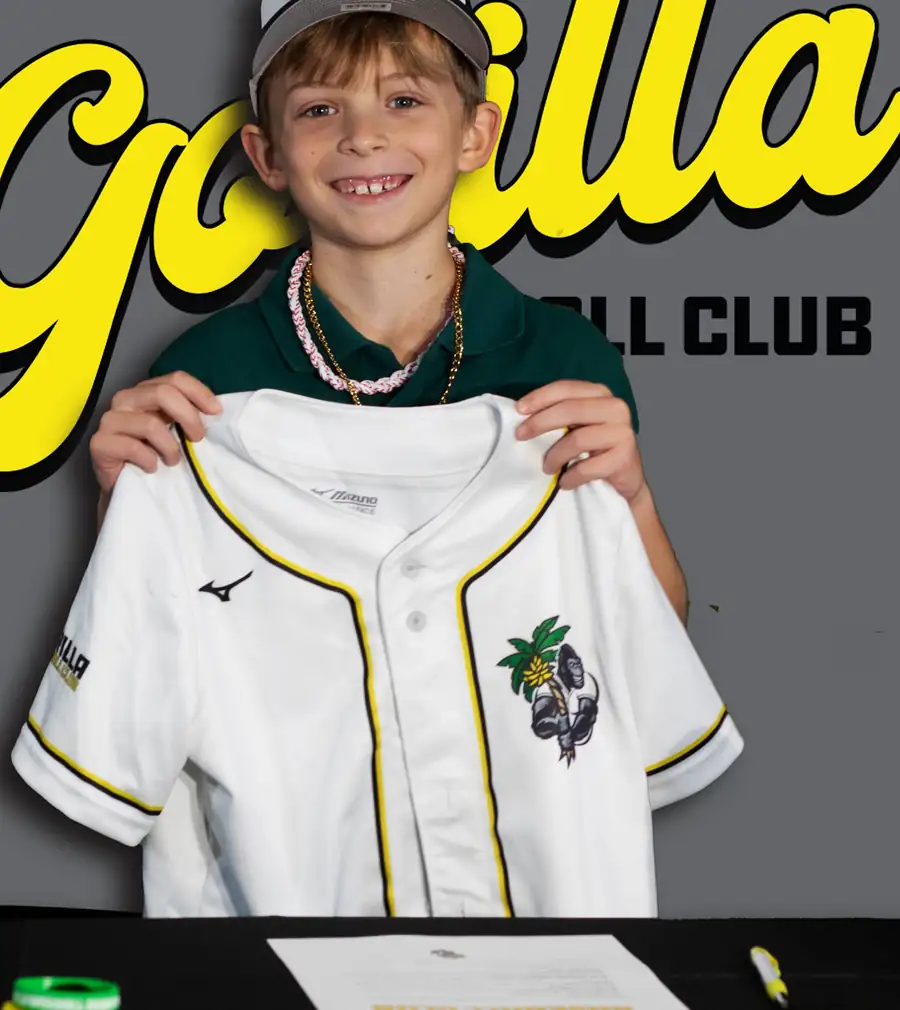
The idea
When our first Gorilla Baseball Club teams came together for the 2024-25 season, we wanted a moment that made our 9U through 14U players feel like they had joined something. If you have been around college recruiting you have seen signing day photos — a senior in front of a branded backdrop, family around them, announcing a commitment.
We thought: why wait until college. These kids just committed to a program, they are about to spend nine months with new teammates and coaches, and their families are putting real money and Saturdays into it. That is worth marking.
But we are a youth baseball program, not a photo studio. Here is exactly how we did it, and what it cost.
Two approaches
Option 1: the improvised green screen
Photograph players against a green backdrop, then replace the green with a branded background in editing. This is what we did.
Pros: lower upfront cost, total flexibility on backgrounds, easy to store and transport.
Cons: requires editing skills and time, and the lighting has to be even or the edit becomes miserable.
Option 2: the step-and-repeat banner
The red carpet approach — a large banner with repeating logos as the backdrop.
Pros: no editing at all, the photo is finished when you take it, reusable for every future event, doubles as facility branding.
Cons: $200 to $500 for a good banner, you are locked into one design, and it still needs proper lighting.
If you are established and your brand is settled, the step-and-repeat earns its money. As a new program still working out our visual identity, the green screen let us experiment.
The setup
The backdrop
We did not buy a professional green screen. Green fabric or tablecloths work — you need something at least 6 by 8 feet, solid, and not too wrinkled. Green poster board or foam core works for headshots. A collapsible green screen kit runs $30 to $75 if you want something reusable.
For mounting, if you have a facility with cages and netting you almost certainly have cables you can hang from. That is what we did and it cost nothing. Otherwise PVC and clamps runs $15 to $30. Our backdrop material came in under $40.
The lighting, which is where people fail
Most non-professionals badly underestimate how much light a camera needs indoors. Your overhead facility lights are not enough. It looks bright to you; it does not to a sensor.
We tried it first with just our overhead lights. The results were terrible — muddy color, shadows everywhere, and a green screen that read as three different shades of green. Adding work lights was night and day.
What we used
Two or three 5,000-lumen LED work lights on stands, the kind in the shop lighting aisle at any hardware store. $20 to $30 each. We already had them at the facility.
Professional umbrella kits are better — softer, more adjustable, $80 to $200 — but the work lights got us there.
How to position them
- Separate the player from the backdrop. Three to six feet of gap. This stops green spilling onto the player and lets you light each separately.
- Light the green evenly. Two lights at 45 degrees to the backdrop, three or four feet away, aimed at the backdrop rather than the player. You want one consistent shade with no hot spots.
- Light the player. Main light in front and slightly above. A third light on the opposite side at lower intensity fills the shadows on their face.
- Diffuse it. Work lights are harsh. Hang a white sheet or shower curtain in front. We stretched a white t-shirt over one of ours and it worked fine.
Check before you shoot. Take a test frame and zoom in on the green. Dark patches or bright spots mean you move a light now rather than fight it in editing for hours later.
The camera
A DSLR with a 50mm lens. The 50mm gives natural proportions and enough depth of field separation to make the player pop. Entry-level used bodies run $400 to $600, and the lens is $100 to $200.
The thing that changed the session: a remote shutter, $15 to $30. Instead of standing behind the camera, we could move around, talk to the kids, demonstrate poses, and still fire the shot. It felt like a photo shoot rather than school picture day, and the kids responded to it.
A modern phone will do this in good light if you do not have a camera.
Memory: we shot 8 to 10 frames per player across five poses. With 60-plus players that is 2,500 to 3,000 images. Bring two or three high-capacity cards.
Settings: tripod at chest height so every frame matches, highest resolution or RAW, and frame wider than you need — you can crop in, you cannot crop out. Test everything before the first family walks in.
Running the session
Three to five minutes per player. Props: team hat, the player contract, a jersey, and a pen.
On jerseys: new players used blanks, but returners brought their own with their name and number on it. Having the name visible makes the photo look far more finished. If you are a first-year program, get a few sample jerseys made with generic numbers.
Our five poses
- Putting on the hat. The moment of becoming a Gorilla. Action beats a straight portrait.
- Signing the contract. Pen in hand, mid-signature. The classic.
- Holding up the signed contract. The announcement shot. Some of them really got into this one.
- Holding up the jersey. Both hands, displayed to camera. Shoot the front for the logo and the back for the name.
- Wearing the jersey. Arms crossed, hands on hips, holding a ball. Whatever looks natural.
You can do anything here — bat over the shoulder, fielding stance, pointing at the camera. Keep each one simple and quick, and build them around whatever your program is actually about.
The player contract
This is the part I would push hardest on. We wrote a real contract rather than a prop:
- I will be a good teammate
- I will try my best to do what the coaches ask me to do
- I will practice regularly to improve my skills
- I will represent Gorilla Baseball Club with respect and sportsmanship
- I will take responsibility for my effort and attitude
After the shoot, every player and parent read it and signed it for real. They took a copy home and we kept one. It stopped being a prop and became the document we point at in February when a kid is struggling with effort — remember what you signed.
Keep the language positive and age-appropriate. What they will do, not what they will not. Something they are proud to sign, not a list of rules.
Coaching the poses
For 9U to 11U, give specific simple directions — both hands on the jersey, look right at the camera, show me your game face. Older players can handle more. Keep it structured; consistency across all the photos matters more than individual creativity.
What we learned
- Keep it moving. Bring players in waves by team rather than all at once.
- Stick to the plan. Individual photos only, five poses, next player. It stops the day sprawling.
- Consistency over creativity. The five standard poses meant every photo matched and everyone knew what was coming.
Editing
Two programs, because they do different jobs.
Lightroom for volume
All 2,500-plus images went in. Organize by player, star the best frame per pose, apply exposure and color corrections in batches, flag the selections for export. If every photo is slightly dark because of your lighting, you fix all of them in thirty seconds rather than one at a time.
Use Collections — one per player — and drag the best shots in as you review. Finding a specific player's best signing pose later takes seconds.
Photoshop for precision
- Select the green. Select > Color Range, click the green, it finds every similar tone. Delete it and the player is on a transparent layer.
- Refine the edges. Select and Mask cleans up green halo and the mess around hair.
- Save as PNG with transparency, so the player can go on any background.
- Drop onto one template. We built a single background — grey, large Gorilla wordmark, placeholder text for name and team. Every player went onto the same file. Position, scale, change the text, export.
- Export big. We went 2400 by 3000 for print quality.
Why one background matters: visual consistency meant instant recognition when parents shared them. It also meant designing one good background instead of sixty. That is how you get through a project like this without losing your mind.
About 5 to 10 minutes per photo in Photoshop once the workflow settled, plus an hour or two of sorting in Lightroom for the whole set.
If you do not have Adobe
GIMP and Photopea both do green screen removal and compositing for free. Photopea runs in a browser and opens PSD files. Darktable replaces Lightroom. Remove.bg handles the cutout with AI if you only need that part.
Getting them to families
- SmugMug for hosting. Private galleries by team, full-resolution downloads. Google Drive does the job for free.
- Instagram for each player, tagging families where we could. They reposted everywhere.
- Prints we skipped in year one, but families want them and it is a small revenue line.
What it cost
| Green fabric backdrop | $30 |
| LED work lights | $0 (had them) · $40–75 to buy |
| Mounting | $0 (netting cables) · $15–30 |
| DSLR body, used | $400–600 |
| 50mm lens | $100–200 |
| Remote shutter | $15–30 |
| Memory cards | $30–60 |
| Adobe Photography Plan | about $10–15 a month |
All in, first year including camera gear: roughly $575 to $890.
If you already have a camera and facility lights: $175 to $240.
If you use a phone and free software: under $50 — just the fabric and some clips.
Time: about 20 hours total across setup, shooting, sorting and editing.
The step-and-repeat route runs $400 to $600 upfront and about 5 hours, since there is no editing.
Mistakes to avoid
- Uneven light on the green. You will pay for it in hours of editing.
- Player too close to the backdrop. Green spills onto them and they glow. Three feet minimum.
- A busy background. The player is the subject. Keep it clean.
- Not enough frames. Kids blink and fidget. Ten per player gives you one good one.
Was it worth it
Yes, and not only for the reason we expected.
The photos went everywhere — personal accounts, grandparents, group texts. That was free advertising and it brought inquiries. They became profile pictures, newsletter images, website content, and we are still using them.
But the part that mattered was what happened at practice. We treated 9U players with the same seriousness a college recruiter gives a senior, and told them they were part of something. They believed it. They stood taller and they were more engaged. Their parents noticed the effort.
Whether you use a green screen, a banner, or a clean wall with decent light, the message is the same: your players matter, their commitment matters, and you are building something worth marking.
Or we will run it for your club
You are busy running practices, managing rosters and chasing tournament entries. If adding a photo shoot to that list sounds like a lot, we do signing day events for other programs.
- Complete on-site setup — backdrop, lighting, camera
- The photo session, run to a structured set of poses
- All post-production and green screen compositing
- A custom background built around your club’s branding
- High-resolution delivery to your families
- Player contracts and signing props if you want them
Coach Dolenga
Owner, Gorilla Baseball Academy & Gorilla Baseball Club
Questions about doing it yourself? We are always happy to help other programs level up. Find us on Instagram @gorillabball.